A Harry Potter enthusiast's recipes, patterns, and projects.
Saturday, December 24, 2011
DIY Christmas Gift Bags
My family has always given our Christmas gifts in homemade fabric bags. I didn't realize how special this was until I started buying and wrapping my own gifts as an adult....what a pain! Not only does all that wrapping cost money and time, but when all the festivities are over, the wrapping paper, gift bags, and tissue paper all end up in a landfill!
Luckily, there is a more eco-friendly way to give presents! These fabric gift bags are easy to make and will last for years and years. With Christmas fabric on mega-clearance after the holidays, you can pick up yards of fun designs for almost nothing! This idea can easily translate to gift bags for other holidays, birthdays, or whatever. This year I plan to make several wine-sized bags to give as hostess gifts. I might even end up selling some of these on my Etsy shop.
Supplies:
Fabric
Ribbon or yarn for ties
Sewing shears
Directions:
With like sides together, cut out rectangles of various sizes (save yourself some cutting by using a folded edge as one side). Using the size of your bags as a guide, also cut ribbon or yarn for the ties. Even with small bags, you'll need at least 2 feet of ribbon for a decent bow. If in doubt, longer is better.
Fold the ribbon in half and pin the folded edge between your fabric, about a fourth of the way down from the top of the bag. Make sure the long edges of your ribbon are "inside" the bag as you are sewing. Sew all edges together, except the "top."
Finish the bag by hemming the top. Make your top hem larger than usual, since this will show when the bag is used.
Flip the bag right side out and press. Use stickers or tags to mark the giver and receiver of your gift.
Monday, December 19, 2011
Kifli
Kifli - a Warner family favorite. The recipe is originally Hungarian...we are not quite sure how it entered into the German side of the family. Nevertheless, it's a Christmas cookie recipe worth sharing!
For the dough, mix: -->
8 oz cream cheese, softened
2 sticks butter, softened
Then add 3 C flour.
Mix and refrigerate overnight (at least 4 hours).
While the dough is resting, prepare the nut filling:
1 lb ground walnuts (about 3 and 1/2 cups)
1 C sugar
1 tsp vanilla
¼ C milk
When the dough is ready, preheat the oven to 350. Roll into 1 inch balls (the full recipe should make about 48 balls all together).
Roll out into flat rounds. Fill with nut filling.
Seal into cresent moon shape. Put sealed edge on bottom of tray.
Bake at 350 for 15 minutes or until lightly brown. Dust with powered sugar when cooled.
Saturday, November 19, 2011
Praline Pumpkin Pie
The key to this pie dough is keeping everything COLD. Don't take anything out of the fridge or freezer until you have to. Work as quickly as you can and always refrigerate everything for the full amount of time. This will make the dough easier to work with and, thanks to the cold vodka, will result in the flakiest crust you can possibly have.
The Best Pie Dough Ever
From Cooks Illustrated, December 2007
For 2 pie crusts or 1 double-crust pie
2 1/2 cups unbleached all-purpose flour
1 tsp table salt
2 tbsp sugar
12 tbsp (1 1/2 sticks) cold unsalted butter, cut into 1/4 inch slices
1/2 cup cold vegetable shortening, cut into 4 pieces
1/4 cup cold vodka
1/4 cup cold water
To make the dough:
In a food processor, mix 1 1/2 cups flour, salt, and sugar until combined, about 2 one-second pulses. Add butter and shortening and process until homogeneous dough just starts to collect in uneven clumps, about 15 seconds. Dough will resemble cottage cheese curds and there should be no uncoated flour.
Scrape bowl with rubber spatula and redistribute dough evenly around blade. Add remaining cup of flour and pulse until mixture is evenly distributed around bowl and mass or dough has been broken up, 4 to 6 quick pulses. Empty mixture into medium bowl.
Sprinkle vodka and water over mixture. With spatula, use folding motion to mix, pressing down on dough until it is slightly tacky and sticks together. Divide dough into two even balls and flatten each into 4-inch disks. Wrap in plastic wrap and refrigerate at least 45 minutes or up to 2 days. Dough can be frozen to use at a later date.
To make the crust:
Roll out dough ball so it's an inch wider than your pie pan. Use your roller to pick up most of the dough (so it doesn't fall apart). Gently lower into your pie pan. Press into corners of pan lightly and cut off edges to make crust even. Use a fork or your fingers to crimp the edge. Refrigerate again for at least 30 minutes so dough can rest.
Praline Pumpkin Pie
Filling:
2 eggs, slightly beaten
1/2 cup sugar
1 - 15 oz can pumpkin
1 - 12 oz can evaporated milk
1 tsp cinnamon
1/2 tsp salt
1/2 tsp ginger
1/8 tsp cloves
Topping:
1/2 cup brown sugar
1/2 cup chopped pecans
2 tbsp butter, softened
Preheat oven to 425 degrees.
Mix all filling ingredients together and pour into prepared raw pie crust. Bake for 15 minutes. While pie is baking, prepare topping.
Reduce oven temperature to 350 degrees. Continue baking for another 35 minutes.
Sprinkle topping on top of pie and bake for another 10 minutes.
Remove from oven. Let cool on the stovetop before refrigerating another 4-6 hours.
Almond Party Spread
Ok, so this might not be the healthiest snack ever, but it is darn good. It's the perfect spread for a football gathering, cocktail hour, or Christmas party (I LOVE weekends in December). I make it several times a year for friends and everyone always loves it!
Almond Party Spread
8 oz cream cheese, softened
1 1/2 cups shredded Swiss Cheese
1/3 cup mayo or Miracle Whip (reduced fat is ok)
1 green onion, chopped
1/8 tsp ground nutmeg
1/8 tsp pepper
1 cup sliced almonds
1 tbsp butter
Preheat oven to 350 degrees.
Combine all ingredients except almonds. Press into 8x8 or pie pan.
Toast almonds with butter and sprinkle on top of mixture.
Bake for 10-15 minutes or until cheese is bubbly and melted. Let cool a few minutes. Serve with bread or crackers.
Mom's Egg Bake
Ah, hot dish...a Minnesota tradition. Who doesn't love a good hot dish?
This recipe is my family's absolute favorite. We eat it at all family brunches and most holiday breakfasts. Really, you just need to try it.
Mom's Egg Bake
Serves 6-8
1 - 5 oz bag (about 4 cups) croutons
1 lb sausage or sausage substitute, cooked
2 cups cheddar cheese
10 eggs
2 cups milk
1 can cream of mushroom soup
Preheat oven to 350 degrees.
In a greased 9x13 pan, layer croutons, sausage, and cheddar cheese.
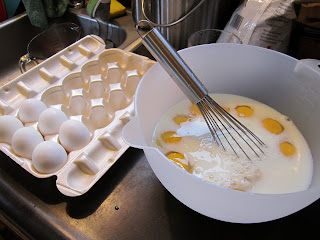
In a large bowl, mix eggs, milk, and cream of mushroom soup. Pour egg mixture over layers.
Bake for 45 minutes - 1 hour, until eggs are set. Let cool 5-10 minutes. Cut into 8 pieces. Serve with tOHast or English muffins.
Monday, November 14, 2011
Creme Brulee
It has been a busy few weeks here at the Warner household! While I've been cooking and crafting up a storm, time to post has been limited with traveling and visits from family and friends. The good news is that I have lots of recipes and projects to share over the next few weeks!
As suggested by my friend Betsy, the homemade vanilla extract mentioned in my first post makes excellent creme brulee. Just thinking about the creamy pudding makes my mouth water! I knew I wanted to make some, as a treat for Betsy and myself, but it would be another month before my homemade vanilla extract would be ready.
Luckily, amazing vanilla extract can be bought at the grocery store. I love the depth of flavor of Nielsen-Massey Madagascar Bourbon Vanilla Extract. It's a bit pricey but I wouldn't use anything else (beside my own extract, of course) for such a vanilla-reliant recipe.
Here is the simple, yet delicious recipe. Thanks to my mother-in-law for this one.
Creme Brulee
Serves 6-8
2 C whipping cream
5 egg yolks (save the whites for omlettes or meringues)
1/2 C sugar
1 Tbsp vanilla extract
1 Tbsp Grand Marnier (optional)
Sugar in the Raw for topping
Preheat oven to 275 degrees.
Combine all ingredients, except Sugar in the Raw. Stir with a wire whisk until sugar dissolves and mixture is smooth. Pour into round or oval individual baking dishes (I filled 8 nicely). Place dishes in a large roasting or broiling pan - a 9x13 pan would also work for this. Fill pan with warm water until it reaches 1/2 inch up the sides of the baking dishes.
Carefully place the pan in the oven and bake for 45-50 minutes at 275 degrees. The custard should be just a little wiggly (almost set). Cool the custards in the pan still filled with water. Remove from pan when cool. Cover and refrigerate for 6 hours and up to 5 days.
When ready to serve, sprinkle each custard with about 1 1/2 tablespoons of Sugar in the Raw. Torch until golden brown. Let stand 3-5 minutes to let sugar harden.
Sunday, October 30, 2011
Homemade Vanilla Extract
Ok, this is it - the first post. Despite creating this blog (don't you love the name!) almost a year ago, I have yet to write or post anything. I guess you could say I'm scared of commitment, of having one more thing to do, of putting myself and my writing abilities out there. Yet, I want to share my recipes, patterns, and projects with the world. I am excited and inspired by the idea of it all.
So, here I go.
I originally meant for my first post to be for butterbeer cupcakes. However, those will have to be featured at some other point in time because I started a big project this weekend - making homemade vanilla.
Sounds daunting, right? Luckily, it isn't! In fact, making vanilla extract will be one of the easiest things you'll ever do. Here's what you need:
3 vanilla beans
1 cup vodka
1 glass mason jar
I ordered my vanilla beans from Olive Nation. I can endorse the good reviews the company has received. The beans were very reasonably priced and arrived at my house in a matter of days. The vacuum-packed Madagascar Bourbon beans that I ordered smelled amazing and were moist and plump. The half pound I ordered might have been a bit of an overkill, but I wanted enough to fill all 30 of the vials I plan to give out as Christmas gifts. Plus, who can resist homemade vanilla bean ice cream? I certainly can't...
Once you have the beans, it's time for the "work." Leaving an inch connected at the top, cut each bean in half lengthwise. Put the split beans in your sterilized mason jar, cover with vodka, and you are done. Seriously.
Of course, you will need to store your concoction in a cool, dark place and shake it every once and a while. Other than that, all you need to do is wait. In 8 weeks, you will have your own homemade vanilla extract!
UPDATE:
Congratulations! After about 6 weeks in a dark space, your vanilla extract is close to being done! While the extract would be okay to use at this point, a few more weeks would deeper both the color and flavor of the vanilla. Either way, do not expect your vanilla to get as dark as store-bought kinds. Most of the time, both color and sugar are added to the extract (and you don't need those, do you?).
Subscribe to:
Posts (Atom)